Difference between revisions of "Freeform Report"
| Line 44: | Line 44: | ||
[[File:Freeform Picture9.png|300px]] | [[File:Freeform Picture9.png|300px]] | ||
| + | |||
| + | ==Updating existing members== | ||
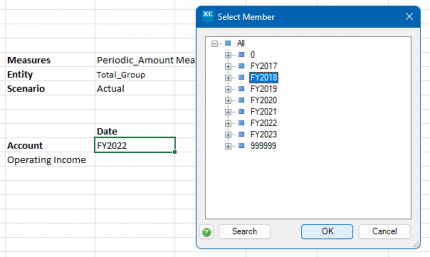
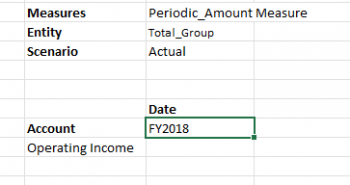
| + | Existing members in rows, columns or filters can be directly overtyped on the sheet or alternatively be selected from the “Select Member” dialog that can be displayed from the “FluenceXL\Pick member” right click menu: | ||
| + | |||
| + | [[File:Freeform Picture10.png|430px]] | ||
| + | |||
| + | [[File:Freeform Picture11.png|430px]] | ||
| + | |||
| + | [[File:Freeform Picture12.png|350px]] | ||
| + | |||
| + | Note that using the member picker will not trigger the refresh of the data. | ||
| + | |||
| + | ==Refreshing a Freeform report== | ||
| + | When existing members in rows, columns or filters have been changed, select “FluenceXL\Refresh” from the right click menu or press CTRL + SHIFT + R to trigger the refresh of the data area. | ||
Revision as of 13:50, 4 September 2023
From version 2308.1 FluenceXL supports Freeform reports.
A Freeform report is an hybrid query object that combines the flexibility of cell based reporting (similarly to FluenceXl formulas) with the performance of grids. It is natively available for any type of dimensional data source as well as for relational ones, using a Pivot View.
Contents
[hide]Inserting a Freeform report
From a grid
The recommended way to create a Freeform report is to convert an existing grid from the right click menu:
From Excel cells
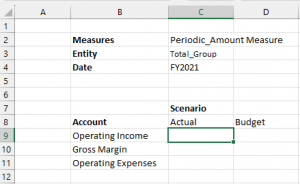
A Freeform report can also be directly inserted from the Excel sheet by letting FluenceXL analyse the surrounding ranges of any cell located in the projected data area.
This approach requires complying with a strict layout:
- The dimension to use for the columns (here “Scenario”) must vertically align with the top left data cell (C9)
- The dimension to use for the rows (here “Account”) must be added right above the first row header, on the same rows as the innermost columns headers
- The dimensions to use as filters (here “Measures”, “Entity”, and “Date”) must vertically align with the outermost row dimension, 3 rows above the column dimensions
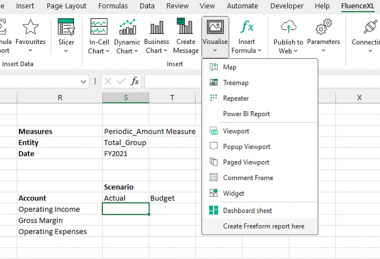
Once this layout is properly setup, select any cell from the data area and click “Create Freeform report here” from the “Visualise” menu:
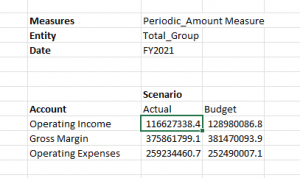
This will create a Freeform report and populate the data cells accordingly:
Removing a Freeform report
Make sure you never delete the top left data cell as it holds the location of the Freeform report. Doing so will not remove the Freeform report from the Excel sheet.
Use “Remove Freeform report” instead from the right click menu if you want to delete a Freeform report.
Alternatively, you can use “Workbook objects” in the “More...” menu of the FluenceXL ribbon to locate or delete any Freeform report in the current workbook:
Updating existing members
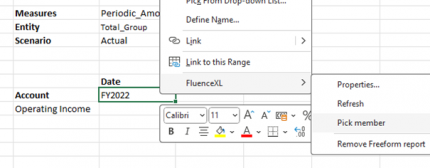
Existing members in rows, columns or filters can be directly overtyped on the sheet or alternatively be selected from the “Select Member” dialog that can be displayed from the “FluenceXL\Pick member” right click menu:
Note that using the member picker will not trigger the refresh of the data.
Refreshing a Freeform report
When existing members in rows, columns or filters have been changed, select “FluenceXL\Refresh” from the right click menu or press CTRL + SHIFT + R to trigger the refresh of the data area.


